Pages

Monday, November 4, 2019

Restoring a Thrift Store Chair

Hey guys! I’m trying to keep up with a blog entry a week and a craft a week. This week I finished a project I started months ago. I didn’t want to spend money on fabric and batting, so I put it off. But this week I did some creative shopping and finished this project on the cheap.

The Chair
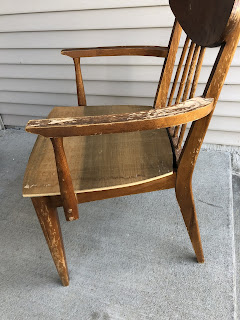
I found this chair at Habitat for Humanity Restore and fell in love...not with the condition of it, but the shape. It had beautiful, clean, mid-century lines. I knew it could be as beautiful as it once was.


Step One: Sanding
I used a small detail sander on the flat parts of this chair, which went quickly. But.....most of this chair was not flat. I used 80 grit sandpaper to sand the rest by hand. This was not a fun task. When that was done (days later), I went over the chair with a finer grit sandpaper, again by hand. This is what it looked like when it was done. The cat approved.
Step Two: Staining
This was the difficult part. I just couldn’t decide what color I wanted. I almost chose to wax it because I loved the natural color of the wood, but decided on using some stain I had on hand, Minwax in Early American. After testing the stain on different parts of the chair, I realized that the back of the chair, which was covered with a wood veneer, was darker than the rest of the chair. When I used just a water-based polyurethane, it almost perfectly matched the stained wood on the rest of the chair. Here is what it looked like after staining. 

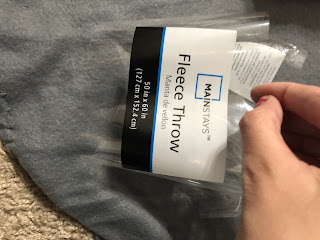
From here, all that was left was to upholster! I thought about so many fabrics. I could choose a pattern, colors, or something simple. Since I didn’t want to do it again in the future, I landed on something simple. I’ve told you before that I’m cheap and this was no exception. I already had some foam from an old mattress topper, but I saw the prices of fabric and batting, and just said no. So I put it off...for months. Finally, I made it a priority again, but insisted that I would not spend more than $10 on the fabric and batting. I searched the fabric section at my local Walmart, and found a fabric remnants section. I bought a faux suede-like fabric at 2 yards for $3. This was much more than I needed. I checked the prices of the cotton batting and really didn’t want to pay $7 a yard. So I felt of the cotton batting and thought I could get away with using a fleece blanket for $2.50 instead. 


The fleece throw worked just fine. I stapled it onto the seat of the chair over the foam. Then added the fabric. I don’t know if this was the correct way to do it, but it worked for me on this project. I was thrilled with the final result.
 

This won’t be staying in my bedroom, but will be moved to the office/guest room when that room is finished. I’m so excited for upcoming projects for that room and I can’t wait to share them with you! 


Tuesday, October 29, 2019

Thrift Store Lamp Makeover


Hello Everyone! Life has gotten in the way of blogging recently, but I’m making it a priority. When I started this blog, I didn’t have a direction, I just needed something to do after grad school. This year I’ve spent remodeling my house and doing home updates for my mom and grandma helped me to discover a passion...creating beautiful things. Now I have a direction for this blog. So, without wasting more time talking about myself....

The Ugly Lamps

I stopped by Goodwill, not looking for anything in particular, and stumbled upon these beauties. Knowing my mom had been looking for large lamps, I scooped them up. (Pardon my cat’s bath in the background...she does what she wants).


I had a plan for them and soon convinced my mom to look beyond the dated exterior.

The Goal

I decided I wanted them to look like these lovely lamps from Hobby Lobby. While I wouldn’t call the Hobby Lobby lamps overpriced, I’m far too cheap fiscally responsible (...I’m cheap 🤷‍♀️) to pay that somewhat reasonable price. Why pay more when you can create a one-of-a-kind for less? Also, she wanted a bigger lamp. With my inspiration in mind, I set to work.

Buy it here

Step One

I wanted to use what I had on hand (I keep a collection of leftover and clearance paint) so I used a gray tinted Valspar primer leftover from a project I helped my cousin with. I wanted a layered look with some depth, so I figured the primer color wasn’t that important. This is what it looked like after a coat of primer. Most of the brass was covered, so I was satisfied with one coat.

Step Two

I needed to choose a paint color. I had several laying around from white to cream to gray, brown, and black. I settled on an almost white gray. Here’s what it looked like after one coat of paint.


Step Three

My plan was to use dark wax to give the lamps a turned wood look, but I wanted to use what I had on hand. So, I searched my collection for something that would work. After testing stains over the paint on a paper plate, I chose to use Minwax stain in Jacobean. Using the same brush I used to paint the lamps, a cheap 3” dollar tree brush, I made horizontal strokes, blending until I achieved the look I was going for, which was a bit streaky. I dabbed my brush off on a paper plate before brushing on the lamps. I dipped my brush in the paper plate instead of the stain can when I was able to in order to avoid going overboard...something I often do. Here is what they looked like after the stain was applied.
I wasn't unhappy with the results at this point, but they were a bit shiny. I gave them some time to dry...and they were still shiny. The stain is oil based, so I didn't expect them to be matte. I decided to finish them with a matte clear coat, but I didn't know which one to use. I was wary about using anything water based because I didn't want it to separate, but I also didn't want to mess up or further blend my current finish by brushing something on. I ended up using Krylon Matte Clear Coat, a spray clear coat. And here are the results. 
I am so happy with the results. They don't look exactly like my inspiration photo, but that makes me love them even more. They are perfect for my mom's space. I had to do a side-by-side to believe they were the same lamps as before. 
 My mom, who lives far away, sent me this photo of the lamps in her living room. 

Update: The lamp shades that came with the lamps weren't the best choice for her home. So I happened upon these lamp shades at Goodwill and purchased them for $2.99 each. By the way, what's up with $20 plus lamp shades in every store? I was shocked at the price tags. I told you, I'm cheap. 

Now for the grand totals. 

Lamps: $5.99 each, total $11.98
Primer: Free (already on hand)
Paint: Free
Stain: Free
Top Coat: $3.98, total $3.58 after my dad's veteran's discount
Shades: $2.99 each, total $5.98
Grand Total: $21.54 for both lamps and shades.

In all, the lamps aren't perfect, but they're exactly what we needed. And it was a fun DIY to do with my mom. I can't wait to visit my mom and share a photo of the lamps with their new (thrifted) shades.