Pages

Showing posts with label how to. Show all posts

Monday, November 4, 2019

Restoring a Thrift Store Chair

Hey guys! I’m trying to keep up with a blog entry a week and a craft a week. This week I finished a project I started months ago. I didn’t want to spend money on fabric and batting, so I put it off. But this week I did some creative shopping and finished this project on the cheap.

The Chair
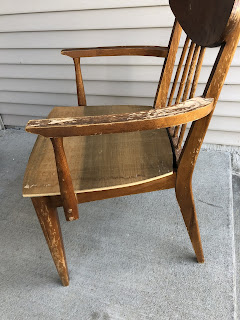
I found this chair at Habitat for Humanity Restore and fell in love...not with the condition of it, but the shape. It had beautiful, clean, mid-century lines. I knew it could be as beautiful as it once was.


Step One: Sanding
I used a small detail sander on the flat parts of this chair, which went quickly. But.....most of this chair was not flat. I used 80 grit sandpaper to sand the rest by hand. This was not a fun task. When that was done (days later), I went over the chair with a finer grit sandpaper, again by hand. This is what it looked like when it was done. The cat approved.
Step Two: Staining
This was the difficult part. I just couldn’t decide what color I wanted. I almost chose to wax it because I loved the natural color of the wood, but decided on using some stain I had on hand, Minwax in Early American. After testing the stain on different parts of the chair, I realized that the back of the chair, which was covered with a wood veneer, was darker than the rest of the chair. When I used just a water-based polyurethane, it almost perfectly matched the stained wood on the rest of the chair. Here is what it looked like after staining. 

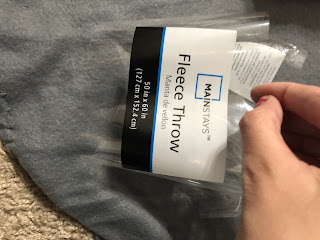
From here, all that was left was to upholster! I thought about so many fabrics. I could choose a pattern, colors, or something simple. Since I didn’t want to do it again in the future, I landed on something simple. I’ve told you before that I’m cheap and this was no exception. I already had some foam from an old mattress topper, but I saw the prices of fabric and batting, and just said no. So I put it off...for months. Finally, I made it a priority again, but insisted that I would not spend more than $10 on the fabric and batting. I searched the fabric section at my local Walmart, and found a fabric remnants section. I bought a faux suede-like fabric at 2 yards for $3. This was much more than I needed. I checked the prices of the cotton batting and really didn’t want to pay $7 a yard. So I felt of the cotton batting and thought I could get away with using a fleece blanket for $2.50 instead. 


The fleece throw worked just fine. I stapled it onto the seat of the chair over the foam. Then added the fabric. I don’t know if this was the correct way to do it, but it worked for me on this project. I was thrilled with the final result.
 

This won’t be staying in my bedroom, but will be moved to the office/guest room when that room is finished. I’m so excited for upcoming projects for that room and I can’t wait to share them with you! 


Sunday, February 22, 2015

My Acne Story...

...and I how I cleared it up.


How I went from acne to clear.


Hello everyone! I'm still living in a winter wonderland here in Kentucky. I've been stuck inside the house for a week and I finally get to go back to school tomorrow! With midterms coming up, I'll keep this brief.  I wanted to tell you guys about my years long struggle with acne and the things I've tried to do to make it better.  It's been a long journey, but I feel like I've finally got it under control.  Thanks for reading. I hope you find this helpful.

*Disclaimer: I am not a dermatologist or any kind of skin-care professional. What you're about to read is my personal experience and what has worked for me.

I started getting acne when I was about 12 years old.  It was several pimples, both small and the deep large ones, on my chin.  I tried just about everything available over the counter.  All of the systems available at the drug store and even the stuff from the infomercials didn't do anything for me but make my face red.  I tried them all for long periods of time and was very careful to follow a routine.  

A photo of me at 12 will be inserted here when I can find one. We did not have a digital camera in 2001.  

When I was 13, I went to a dermatologist.  I tried several prescriptions. Some that did nothing, some that made me break out, and some that made me throw up (gross, I know).  Finally, I was given Differin (adapalene) cream in 0.1%.  This was the first time that I noticed an improvement in my acne.  It was completely clear (like, I couldn't get a pimple) all the way through high school.  

Me at age 14. See how perfect my skin was!

When I was around 22, I started getting acne again.  It was on my chin and the Differin didn't seem to help, so I stopped using it.  That was a bad idea.  When I stopped using the Differin my acne got worse and using it again did nothing.  It got pretty bad after that.

 
Started with pimples on my chin.

I got frustrated and stopped doing my regular routine.  Sometimes I would go two days...maybe more once or twice three days...without washing my face.  That made things even worse.  While I had never had acne on my forehead, now it started.  The worst part was the fact that starting my routine again didn't help. Here's what happened after that:


This was during the time when I was being very unpredictable with my skin-care routine.

This was June 2013, when we bought our first house. No improvement and no change in routine.


In the three pictures above, I had started using the Differin and adding Kate Somerville EradiKate, a sulfur spot treatment.


Finally I decided to try benzoyl peroxide again. The photos above show what happened with that. I still use the EradiKate when I have a bad spot.  I started using Murad Acne Spot Treatment all over my problem areas (chin, nose, forehead).

Now that I have showed you every terrible picture of me in the past 3 years (and one from high school) I'll show you photos of me with and without makeup today.

The only photo with makeup.

No makeup

No makeup. Small spot on my cheek.

No makeup again. 

Thanks for reading. Be sure to leave comments with any questions and I'll do my best to answer them. Btw...I didn't think that my acne ever got bad enough to try isotretinoin (Accutane).  If it had gotten bad enough, I would have tried it, but since it can be dangerous, I decided to skip that treatment. I also almost decided to get microdermabrasion (to get rid of acne scarring and even out my skin's texture again), but read some terrifying stories about how it had left broken capillaries on people's faces and I cancelled my appointment. I think I'll stick with at-home scrubs.  


Saturday, February 14, 2015

Colorizing Black and White Photos


This is not a complete how-to post, but I would like to share some of my new (very amateur) Photoshop work! I'm using a copy of Photoshop CS2 that I got for my birthday years ago...it's maybe 7 years old.  All I'm doing is working in new layers for each color and changing the blending mode.  If there's any interest, I'll do a complete how to very soon.

The photo above was taken around 1962 (about 54 years old).  It is a photo of my great aunt and great uncle, my grandma's sister and my grandpa's brother.  When I traveled home for my great aunt's funeral, I saw this photo hanging on a collage cork board.  My great uncle expressed interest in having an enlargement.  I couldn't just blow it up...I had to make it better.  After removing some scratches and noise from the photo (using the cloning tool, the patch tool, and noise reduction), I desaturated the photo, added some contrast and sharpened it with smart sharpen.  That made a decent looking black and white.  But I still couldn't let it go.  After talking with my grandma, I learned the color of everything in the photo and went to work.

I added an adjustment layer to the photo, chose a color, inverted the selection, chose "overlay" for the blending mode, and started painting with a paintbrush set to white to let the color layer show up.  I did this for every color that I used (five shades of green for the grass and trees).  I labeled each layer with the name of the thing that I would be painting (pants, shoes, skin) so that I wouldn't get them confused.  When the colors overlapped, like the green and the skin color were one on top of the other, I selected the layer that I wanted to move and used either the smudge tool to move it, or the brush tool to hide it.

Here are my final results:


PS: Don't forget to add some pink tones to their faces.  If you don't, they'll look pale.

Thanks for reading! Be sure to leave comments letting me know what you think, what you want to see, and ideas on what to do better. I want to learn how to Photoshop and take photos!