Things I MUST Photograph
Good afternoon everyone! Since I have plans in the works to get a new camera, I started thinking about new lenses that I would need and the new things that I would photograph with this new equipment. It made me think about all of the things that I wanted to photograph in my lifetime. So I compiled a list, and, though I've completed a few of the things on the list, I plan on posting all of the photos on this blog. Hopefully I'll improve my photography and get pictures that are even better than the ones I already have. Just because I've photographed it once doesn't mean I won't photograph it a million more times.
Here is the list:
1. Lightning- this one seems pretty clear. I'm not super particular about it (like I don't have a specific vision of what it should look like). The thing holding me back from doing this one is the fear of ruining my equipment. Buying a waterproof case for my camera is WAY too expensive for me. I might try using a rain jacket.
2. V-J Day- I'm sure everyone has seen this photograph, the one where the soldier is kissing the nurse after at the end of WWII. I would like to replicate it (well, maybe not replicate, but use it for inspiration).
This is the photo that I took from
Wikipedia.
Obviously, my photo will not look exactly like that. A group of people will not be surrounding me dressed like that. I probably will not be in Times Square, and even if I were, it wouldn't look like that anymore. I think it's better just to use it for inspiration. I could even take it in my town, or somewhere totally different. Here are a few examples taken by other photographers.
I took this photo from
here.
Even something like this that I took from
here.
Sorry I listed so many, but there are so many options for using this photo for inspiration. I'm sure there are SOOO many other ways of doing this and I can't wait to explore them.
3. Rosie the Riveter- another WWII iconic photo. It should be easy to replicate. The only reason I haven't done it is because I don't have a similar outfit or an orange background. I guess I could use a simple roll of paper from the craft store. Below is the original photo.
The poster isn't particularly complicated or stunning, but it is certainly iconic. This might just be my next project. I found a great tutorial on how to copy it from
See Cate Create. Here is her version:
I believe that I could easily do something like this. I am a blonde and I'm not sure if I want to temporarily color my hair or not. I think I'll just leave it and do my own version. I won't have the muscles for that, ha! But, you guys should be looking for my version within the next few days.
4. Macro- there are so many options for this one! I like flowers and water drops. I don't have a great lens for this yet :( but I plan on buying one very soon. Until then, I will continue to use the lenses that I have to take close-to-macro shots. I think that this one is my favorite:

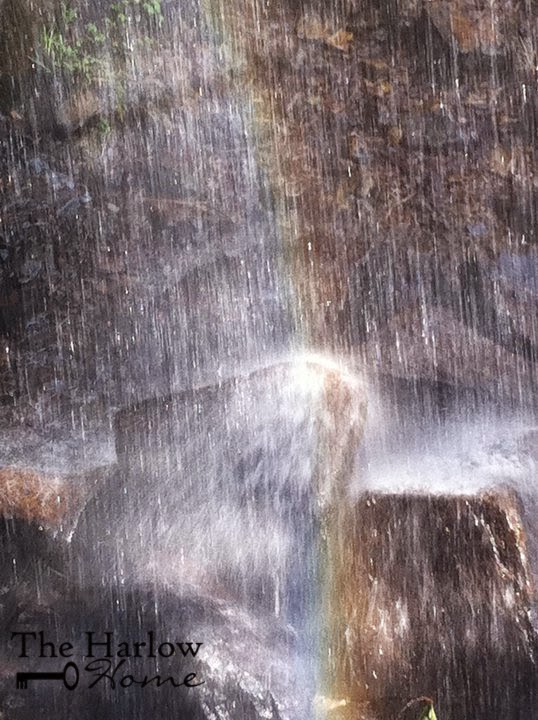
5. Waterfall- I won't be able to replicate any photo because I don't know where the majority of them were taken and I probably won't have the opportunity to travel just for a photo. I do have several photos of waterfalls of my own from several parts of the world. I'll show of few of them below, but I really want to use a polarizing filter and get a slow shutter speed photo of a beautiful waterfall.
I took this photo in Hawaii on Big Island in 2011. I used my old Nikon D50, which I still LOVE. The photo is good, not great, but I didn't know how to use my camera as well back then and I brought nothing but my camera and kit lens. I'm happy with this photo, but I'm still going to take more.
This is a photo of the Cumberland Falls moonbow. I have seen and photographed this more than once, but I had no clue what I was doing. This was 2011 before I knew much about my camera. I think my aperture was set to f/5. It wasn't a good idea. I think I'll go back soon to photograph this beautiful occurrence during the next full moon. This was also taken with my old D50 and kit lens.
I have a confession. I took this with a phone. This is Bad Branch Falls and it is not possible to drive to it. I think it was a half-mile hike. It was hot, humid, and too messy for me to risk my camera. I took out my phone and got this picture. It's pretty, but it could have been better. I'm going to keep trying to get a great waterfall photo.
6. Northern Lights- Sadly, I have never had this opportunity. One day I plan on visiting Alaska and getting these photos. I know that it will be cold and that is why I've never been. We've chosen Bermuda, Florida, and Hawaii for our vacation spots over Alaska...particularly our wintertime vacations. Since I'm sure you all know what these lights look like, I won't post photos. I would be happy with almost any of them. This isn't something that I will get to photograph over and over, so I'll be thrilled with any photographs that I get.
7. Ferris Wheel- I've had infinite opportunities to take a photo of a Ferris wheel this summer. We've had, I think, three fairs in my town. The last one had two Ferris wheels. I was lazy and forgot to pick up my wide angle lens from my parent's house three hours away. Though I do need to buy an better lens, I had no excuse not to get this photo. Oh well, maybe next year. I could have easily gotten a photo similar to this:
8. Rain- I can't do this. It just doesn't show up. Granted, I've never actually gone outdoor to take this photo. I think I'm going to have to be more adventurous...and careful. I don't want to ruin my wonderful cameras! Considering that I come from a temperate rain forest, rain will not be hard to come by.
This is the closest I've gotten...might have been after a rain.
I want something like this that I found
here. It says that it is from High School Musical. I don't know, but I love the way this photo looks. If I can get up the nerve, I'm going to try this.
9. Back-lit Dramatic Light- this is great for athletes. I have never tried to use back-lighting and dramatic light together. I have tried back-light with normal photo lighting.
I took this one using a strobe behind the model and two strobes in front of the model, but the strobes in front are diffused with a soft box and silver umbrella. I can't remember what camera I used to take this photo, but I used a 70mm lens...I think. I love the light and even like the photo, but it isn't exactly what I want.
This is the kind of lighting that I want to try to replicate. At least something similar. I love the harsh, dramatic light. I know I'll need a wide angle lens for this, but I'll find one or just try a different pose. I found this
here.
10. Sports- I only tried this once, and it was before I knew ANYTHING about camera settings. I don't even think I have copies of it. They were okay. You could see what was going on and the motion blur wasn't bad, but I used one of the auto modes on the camera and the color wasn't great. I don't have an exact picture of what I want it to look like, but I want a great action shot. Someone jumping to get a ball or a game-winning shot. I don't want to be a sports photographer, but this seems exciting. Look for a photo like this from me as soon as football season starts (is that now?). We have a state-winning high school next door, so I'll get some shots of their next game...that I know of.
11. City Sky Line- I live in a small city, with like two tall buildings. I did, however, just return from Columbus and Cincinnati. My camera was in the trunk. I took one with my phone, but it was too terrible to even bother sharing. I love the Cincinnati sky line. It is so interesting and the bridges offer a great view of it.
This is the closest thing that I have. Taken with my D50 in 2011. I really knew nothing about photography. This was taken in auto. I'm sad that I missed the opportunity this weekend, but I'll be visiting Newport on the Levee very soon. Look for more photos then.
There's also this one taken at Central Park in New York in 2006. Also taken with my D50. (Love that camera. Works just as well today as it did in 2005). It was taken in auto.
I found this
here. This is what I would like for my photos to look like. I WILL get a photo like this soon. It might be of a smaller city, but I want the lights and pretty colors in the sky.
12. Moving traffic- I just want a photo where the red tail lights are blurred by a slow shutter speed. This one is simple, but could be difficult to complete because I don't have a place above traffic to set my camera on a tripod. I'll start looking and post this photo when I get it.
13. Pin-up- I love pin-up photos. Even the very tame ones (most of them are kinda tame). Maybe it's the makeup that I love, maybe it's the solid color background, maybe it's the beautiful hair. I just love them.
I love this. I found it on pinterest.com, but the blog that shared it had been deactivated. I'm not sure where the original came from.
This is more like something that I would do. I found it
here. It is just closer to my comfort level...if I'm the model. If I'm using another model, I'd try the above photo if that was something that they were comfortable doing.
14. Superman- so, I'm kind of a nerd. I love the photos of women in Superman tees, the ones of little boys in suits with a Superman tee underneath, the ones of newborns with a cape, even the ones of wedding parties wearing superhero tees. I love them all. I have not tried this yet, but here are a few of my favorites.
Found this
here. Not sure if that page is still available, but this is cute.
15. Tent- I have never tried this one. I don't own a tent and I'm not sure how to even build a useless one. Here are a few of my favorites, but I have no clue how to get started on a project like this.
I found this on pinterest.com, but I could not find the original. The link didn't go to anything. It is adorable.
I found this one
here. It was a website of another photographer. So gorgeous! I will get my husband started on a project like this ASAP!
16. Rainbow- I have done this many times. You have already seen several of these photos in this post and another on a different post on this blog. I'm going to get a wide angle lens and try to get a better shot. I don't have a vision of what the photo should look like. I just want a beautiful, colorful rainbow.
17. Snowflake- I have taken lots of pictures in the snow, but I want a macro photo of a single snowflake.
Found
here. I'd like to try something like this. Any lens suggestions. I can't get a good macro shot.
18. Fireworks- I've done this. I did take advantage of The 4th of July. I did forget to buy sparklers :(
This is my favorite of the ones that I took. I love the silhouette. Since I didn't want to miss the fireworks for taking pictures (don't forget to put down the camera and enjoy life), I only took one. I could have gotten a better one, but I'm happy with this.
19. Water Drop- I've tried this many times. My last ones turned out good, but I'm shooting for something better.
This is probably my favorite of the ones that I took. It wasn't the first time that I tried, but possibly the best results.
I wanted it to look more like this, from
here.
20. Christmas Tree Bokeh- I have tried this as well. It turned out okay, but I had to set the ISO too high to get a great picture. I'm going to try again this winter.
I like it and he's too cute, but I could do better. This is me trying to use the flash but turn it down and use available light at the same time. It's too cool. Maybe with a gel over the flash. I'll get a better one this year.
21. Spiderweb- I've never tried this. I usually avoid those things like the plague (because they contain spiders), but they're beautiful. I'd love to get a photo of one right after a rain. I won't post photos because I believe that everyone knows what I'm talking about. We've all see beautiful spiderwebs.
Well, maybe just one. It's from
here.
22. Headlight Silhouette- I started searching to find someone who had tried this. There aren't many out there, but this one is perfect.
I'm going to try this as soon as my husband gets home...and it gets dark.
23. Umbrella Silhouette- Ooohh! I've been looking forward to this! I've never tried it. I never even think about trying it when I have a chance. I'm going to very soon. Here are some great ones that I want to use for inspiration.
I'm not pregnant, but this is too cute! I could use a pose similar to the one above. This is from
here.
24. Portrait in a Forest- I guess I've sort of tried this, but not really. When I hike, I usually just bring my phone. I don't have any decent pictures in the forest. I would like for a photo to look something like this.
25. Reflection- There are so many ways to do this. I've tried using a mirror, but I think I'd also like to use water- a puddle, the lake, maybe even a window (not water, but still a reflection). Here is the photo that I took using a mirror.
I took better photos during that photoshoot, but this was the best reflection. I like it. Now to try reflections on other surfaces!
Whew! Long post. That's my photography bucket list. I hope you guys enjoyed reading. If you have any ideas or requests feel free to leave me a comment. I'm excited to hear from you. What is on your photography bucket list?