Pages

Showing posts with label beginner. Show all posts

Thursday, July 16, 2015

How to: Levitation Photography

I've been looking forward to trying levitation photography for a long time. For those of you who don't know what that is, I'll break it down. The idea is to get a picture where a person (or object) looks as though they are floating. In order to accomplish this, you must use at least two photos. Here are some shots that I took this week!


Here's how to do it.
Things you'll need.
1. A tripod
2. A camera that you can set to manual
3. A chair/ladder/stool anything to get your subject off of the ground

What to do:
1. Set up your tripod...using a remote would be useful, but not absolutely necessary
2. Do not move the camera!!! You'll need at least two shots and the camera should not move and the lighting should not change at all between those shots.
3. Take a photo of an empty background. Like the one below.
4. Take a photo of your subject posed however you want. Like the one below.
5. Open both of these images in Photoshop.
6. Bring up the one with the subject in it and click the layer in the layers box. 
  7. Drag that layer (should be labeled background) onto the photo without the subject as shown below.

8. Add a vector mask. After Layer 1 is highlighted, click the button circled in the photo below. The mask should be added to layer one and it should look the same as where the arrow is pointing. This will allow you to erase away any areas where you want background to show through. 

  9. Make sure the white box next to Layer 1 is highlighted, then click on the paintbrush tool. The colors in the boxes should show up as black and white. Make sure that black is the color on the left, as shown below. 
10. Begin painting over the areas that you want to get rid of. You can start with a big brush and work your way down to a smaller brush as you get closer to your subject. 

11. When you are getting very close to your subject, it can be helpful to use a small brush and lower the opacity. It seems to help blend the two layers, making the transition from one to another less obvious. It will be particularly helpful in areas like the one in the photo below. 


12. When you are happy with the final product. Flatten the image by right clicking one of the layers and then clicking 'flatten image.' 

13. Now you can do any edits that you want to the color, or you can smooth skin and remove blemishes. 

14. Finally, I like to add a shadow below the subject. I usually just use the burn tool to draw in the shadow on the flattened image, but if that is too harsh for your photo you can try something different. You can duplicate the Background layer by right clicking the Background layer and clicking 'duplicate layer'. Then use the burn tool to draw in the shadow on the new layer, reducing the opacity of the layer to suit your taste. 

Option 1:
Simply click the tool that is circled in the photo below and draw on the shadow. If another tool is visible in that spot, right click it and select the one in the photo.
Option 2:
Right click the Background layer and then select 'Duplicate Layer'. I window will pop up. Just select 'OK'. Then paint on the shadow.
Drag down the opacity until the shadow looks the way you want it to look. 


Here is the final result that I got while doing this tutorial.

Disclaimer: Actually a couple of disclaimers. I am not a professional photographer. This is my hobby. I hope to help new hobbyists and "momtographers" to learn new stuff about their cameras. I know that this is not the only way to do this in Photoshop, and maybe not even the best way...but it worked for me.  


Wednesday, June 10, 2015

Summer Photos Speedlight DIY

Summer Shoot: How's that for 55!

That's right. My model for this beautiful June shoot is 55 years old and happens to be my beautiful mom.  Soft lighting is great for smooth looking skin, but she looked 30 to begin with!

Here are a few of my favorites from the day, but wait until you see the ones from sunset!

Our prop was homemade from a chair we got at the Habitat for Humanity ReStore and spray painted.

It was a mostly sunny day so we looked for shade. We went to a public park and found some trees. In most of these pictures the sun was coming from behind her right side. The photos were shot in RAW and only had the contrast adjusted and sharpened. We moved a little closer to the edge of the shade for some of the photos to get the sun in her hair.  In those photos the sun i also behind her, but not directly.  

When the sun set.

As we neared the end of the day, we decided that we wanted more than just silhouette photos with the sunset and broke out the speedlight. It was very simple. We covered it with a soft box and set it to 1/1, the brightest flash, and started shooting.  I first exposed for the sky, then added the flash to illuminate the subject.  All you need is a speedlight that shoots in manual (a cheap one is fine), a radio trigger for that speedlight, and a light stand. 

Another sunset photo.
 Loving our homemade prop in this one.


 Moved to another part of the park.
 Loved the cattails in the background.
Looking directly toward the setting sun behind the clouds.
Maybe one silhouette.

Monday, December 15, 2014

Christmas Photos

It's Christmas Time!!!

It is officially Christmas time, and for us grad students, it's break time! I can finally blog again. Today I'm talking about Christmas photos. My husband and I took photos for Christmas cards in this blog post. I have taken Christmas photos for several others this year and I would love to share them and how they were taken. But first, our Christmas card and the down low on ordering it. 


 Here they are!! I apologize for the terrible quality of the pictures. I took them with my phone, but they are a photo of a photo. They're actually very sharp.

I ordered foil printed cards on pearl paper. Here is a photo of the shimmery paper. Reminds me of Disney. 
When you hold it in the right light, it look kind of like this. So pretty and shimmery.

I ordered these from Miller's Lab. This is a professional photo lab that requires an application and links to your photography website to allow them to make their decision. I love them, but I know that not everyone runs a photography business. I don't call myself a professional, but I did apply to this site and I now use it for all of my own photos as well as my client's photos. When you order press products, like Christmas cards, they send extras just to ensure that you are happy with all of the photos. Plus, they send most orders to my home by the next day. Now that I've raved about Miller's Lab, I'll suggest something that most of my readers will actually use. Mpix is the commercial version of Miller's Lab. They are also fantastic. Granted, they don't calibrate especially for each photo, they do calibrate frequently and offer the opportunity to have nothing done to your photo in lab (like changing the contrast and color). If you're looking for something decent and super cheap, I recommend Snapfish. I've used them for years and store all of my photos there. I have never used Tiny Prints or Minted, but I've heard good things. 

Now for some more adorable Christmas photos!
Love this one! Granted, it was not easy getting one photo of three adorable little boys all looking at the camera at the same time. 

For this photo, all of the boys were not looking at once. This is a compilation of about 5 photos. 

Here's how I did it:
1. Hang Christmas lights on a blank wall. The kind with the white wire. The green would show up in the photos. 
2. Gather the subjects as close together as possible. We're going to be using a wide aperture.
3. Bounce the speed light on top of your camera off of a nearby wall. I let the camera decide how bright it needed to flash. 
4. Make sure that the shutter speed is slow enough to catch the pretty lights behind the subjects. I think mine was around 1/50.
5. Set your aperture as low as it will go (or close). I had mine at f2.0. It could go lower, but we're talking about three subjects...who are young. 
Even at f2, it didn't work. I had to compile several photos to make it work. The individual photos of them turned out great, but all of them together was quite difficult. 


Tuesday, August 5, 2014

Taking Better Family Photos in 4 Steps

A VERY Beginner Tutorial on Improving Photography

Step 1: Learning to use light (even on Auto)

I've had a tough time working with light over the years. I'll show some photos of my progress through the years. I warn you, some of it is bad.
Though this one is adorable. It's not good. This was taken in 2010 when I thought I needed a flash indoors. It was taken on auto. I only though about composition (which is also important). This is a photo of my handsome cousin.
This was taken of a friend's baby at the beginning of 2012. It was my first attempt at creating my own light. I believed I used a clip-on light from Lowe's, with a light bulb that I also purchased from Lowe's. It was cheap, but my camera isn't super expensive and cannot handle super high ISO numbers. 
This photo was taken a few months later using the same setup. It's better, but I really needed better light. I also needed to know how to use it. Reflectors would have helped. Btw, this was after I edited out the hand holding up her chin (yeah, I needed more practice posing too).
This was my first time using mono lights. It wasn't too bad. I did practice beforehand, but not for keeps. This was 2012.
I like this one. I was really trying to get it right. This is the same handsome boy from the first photo. This was in 2013.
This was taken at a friend's wedding in 2013. To be fair, the only way to get the rainbow in the background was to face the light. It's not too bad, and the light was not super harsh.
A picture taken about a week ago. I really love this one and I actually felt like I knew what I was doing (with the camera, posing is still tough).

I showed you all of those pictures to show you that my photos did not always look like the ones that I post today. Even my pictures now are far from perfect, and I'm always looking to improve. But since I have improved, I wanted to share my progress and help you to struggle less than I did when you're learning how to take pictures, and hopefully you'll get better faster.

I'm going to say this again. I am not a professional. I feel like the most important part of a photograph, particularly a portrait, is light. Different lighting can completely change a photograph. It is probably best to start with natural light because it is continuous, making it easier to see what the photograph will look like before shooting. This will give you the opportunity to learn what light from different directions, and of different levels of being diffused (...?) look like.   

When working with outdoor light:
1. I feel like the first thing you need to know is what kind of light you've got. Is it harsh and directional or soft and diffused? Where is the source? This will help you determine what settings you need to use on your camera and what your photo will look like. Determine the sun's position in the sky. If it is strait overhead (noon-3pm in the summer), you will likely want to seek shade. If it is cloudy, you'll want to warm up the photo. Sunset and sunrise are the best times to take a photograph. The sun in low in the sky and casts a beautiful light on your subjects.

2. Determine what you want the photo to look like. If you want harsh, dramatic shadows, wait until a day with very few clouds in the sky. Look at the subject to see what the light looks like on his/her face. If one side is much brighter than the other, the model may need to turn to face, or turn away from, the light.

3. Choose your camera settings. I'll explain more about camera settings in a future post in this series, but one thing you need to know that is important to post now is to determine which metering mode is appropriate for the light that you're stuck with. I almost always use spot metering. I just like it better and I usually only care if the subject is properly exposed. If you're confused about what metering modes are and don't know how to change them, I'll give a short tutorial.

(Break for tutorial (skip this if you already have a basic understanding of metering): Here is what it looks like on the top of my trusted Nikon D90.
The dot inside the rectangle below the number 90 shows that I am using spot metering.

To change this on my camera, I simply have to press and hold down the button directly under the word off and twist the dial on the back of the camera. There are two other types of metering on my camera, center weighted (the icon will change to something like looks like parentheses around the spot), and matrix (the icon will change to a picture that looks like the button below the word off). I sometimes use matrix metering if I want an entire photograph to be properly exposed, but spot metering is my favorite. It allows me to make a single spot of the photograph a priority for being exposed properly. 

The icon below the metering icon is the thing that tells you where your camera is going to focus when it's set to auto-focus (I don't know all of the technical names for these things). Use the arrows to move it around until it covers the spot you want it to focus on. This will tell the spot metering where to meter. (Note: sometimes you have to ignore the meter altogether because you know better than it does).

End of tutorial)

4. Get creative. You don't need great light to take a great photograph. It might not look the way you wanted it to look, but if you're creative you can make it something totally different.
This photo shows that you barely need any light at all to take an interesting photograph.

More talk about just using auto in the next post. I'll continue talking about light. Let me know in the comments if you would like to see something different. Thanks for reading! 

Thursday, July 31, 2014

DIY Family Portraits

Taking Photos from Non-Traditional Light Sources

Before I start on this post, I want to reiterate the fact that I am NOT a professional. I am simply sharing what I've learned and what I'm doing to get the look of the photos that I take. In this post, I'm talking about working with unique light sources. Most new photographers use natural outdoor light or their on-camera flash to take photos. There are many other creative ways of using light for photographs.

In the photo above, the sun is still the light source, but it is not being used in a traditional way. We used the evening sun (which was not pouring into the window, but coming from a direction where there was no window). This created enough light so that the window would be illuminated, but would not cast too much light on us, the subjects. I turned the shutter speed up higher than I normally would for an indoor photo, around 1/100th of a second. I kept the aperture low, about 1.8, because I did not want the background to be distracting (the room was pretty messy). I also kept the ISO low, about 100, because I did not want a large amount of light in the photo and, since the photo is very dark, I did not want it to look grainy.


This cute family photo (totally not perfect, but still fun) was created using several light sources. The two that were intentional were the speedlight that sat on top of the camera and the flashlight on our cell phones. Yep, that was all of that craziness is. We turned on the flashlights on our iPhone 5's and my dad, left, and my husband, right started drawing. I did want to do this with sparklers like I had done in the past, but we didn't have any and I didn't want to run to Walmart on the 4th of July. So...we improvised. This wasn't difficult to create. I could have drug my mono-lights and softboxes outside, but this was easy and fun. We wanted it to be fun, not work. I'll list the steps used to create this photo below.
1. Set camera on a tripod.
2. Use a timer or a remote (long shutter speeds will cause visible camera shake).
3. Set your camera to manual or shutter priority, S on a Nikon. I used manual and a shutter speed of anywhere from 3 to 8 seconds for all of the pictures we took.
4. Use a flash. If you're doing this outdoors your camera flash might not be enough, I learned that when I did this before with sparklers. You only need the flash if you want to see the people in the shot. If you just want to see the light drawing, forget the flash.
5. When the flash fires, make sure that you're posing the way you want to look in the shot. As soon as the flash goes off begin drawing, trying to finish in time for the shutter to close.


The photo above might not look like the lighting situation was unique, but it is not something that I normally do. I usually have a whole studio set-up for newborn photos, but that was not an option for this photo. I combined natural light and the flash from a speedlight to create this picture. My husband's grandmother made the throw and I still had it at my parents' house (luckily). I made the hat about a year ago for another newborn and it was also at my parents' house (really lucky, I live three hours away). We used a couch cushion and curved newborn pillow (don't know what they're called, but the mom happened to have one) to get the pose. Since the light was low, I turned the ISO up to about 200 and switched the aperture from 1.8 to 2.8 to get a blurry background, but didn't want to get it too wide to make the face out of focus. Since the baby didn't move much, I moved the shutter speed from 1/60th of a second to 1/90th of a second depending on the changing light. We opened a door, and I bounced the flash off of the walls, moving it when I moved and when the light changed.

It can be difficult to learn to work with lighting situations that are not ideal, but sometimes something creative an beautiful can come out of it. Thanks for reading! Please leave comments and let me know if you would like for me to do more in-depth, step-by-step tutorials on how to achieve these shots. More posts to come soon!

Friday, July 25, 2014

DIY Portraits

Taking Your Own Family Photos

I love pictures...pictures of me, my family, my friends, and others. I simply cannot afford to hire a professional photographer every time  I need to update the portraits in my living room and my profile pictures for social networking sites. When you're broke (like me) and on a very unpredictable schedule (also like me), you learn to take your own portraits. I have owned (and have been learning to use) a DSLR camera for the past 10 years. I know, I'm only 25, that means that I've been doing this since I was 15. I do have some equipment that most amateur photographers do not own, but hopefully I can help those of you who are just starting out, learn a little more about how to take some better looking photos of your loved ones.
 This is one of the most recent photos taken of me and my husband.
What you'll need:
1. A tripod. This will be necessary if you are doing this without the help of someone that you do not want in the photo. And it will be particularly helpful if you are very particular about how you want your photo composed and framed.
2. A DSLR camera is preferred, but you can get good quality photos from a point-and-shoot or even a smart phone.
What would make it even better (these things are optional):
1. A reflector. This will help balance and even the light, but can be difficult to use when taking photos of yourself.
2. A remote to control your camera. It is easier than using a timer and running and is particularly helpful in groups when you need more than one continuous shot. But it can be difficult to hide said remote if your hands will be showing in the photo.
3. Some sort of off-camera flash, and gels if you'll be shooting in lighting conditions that are not exactly white.
4. A polarized filter if you will be shooting in bright sunlight.
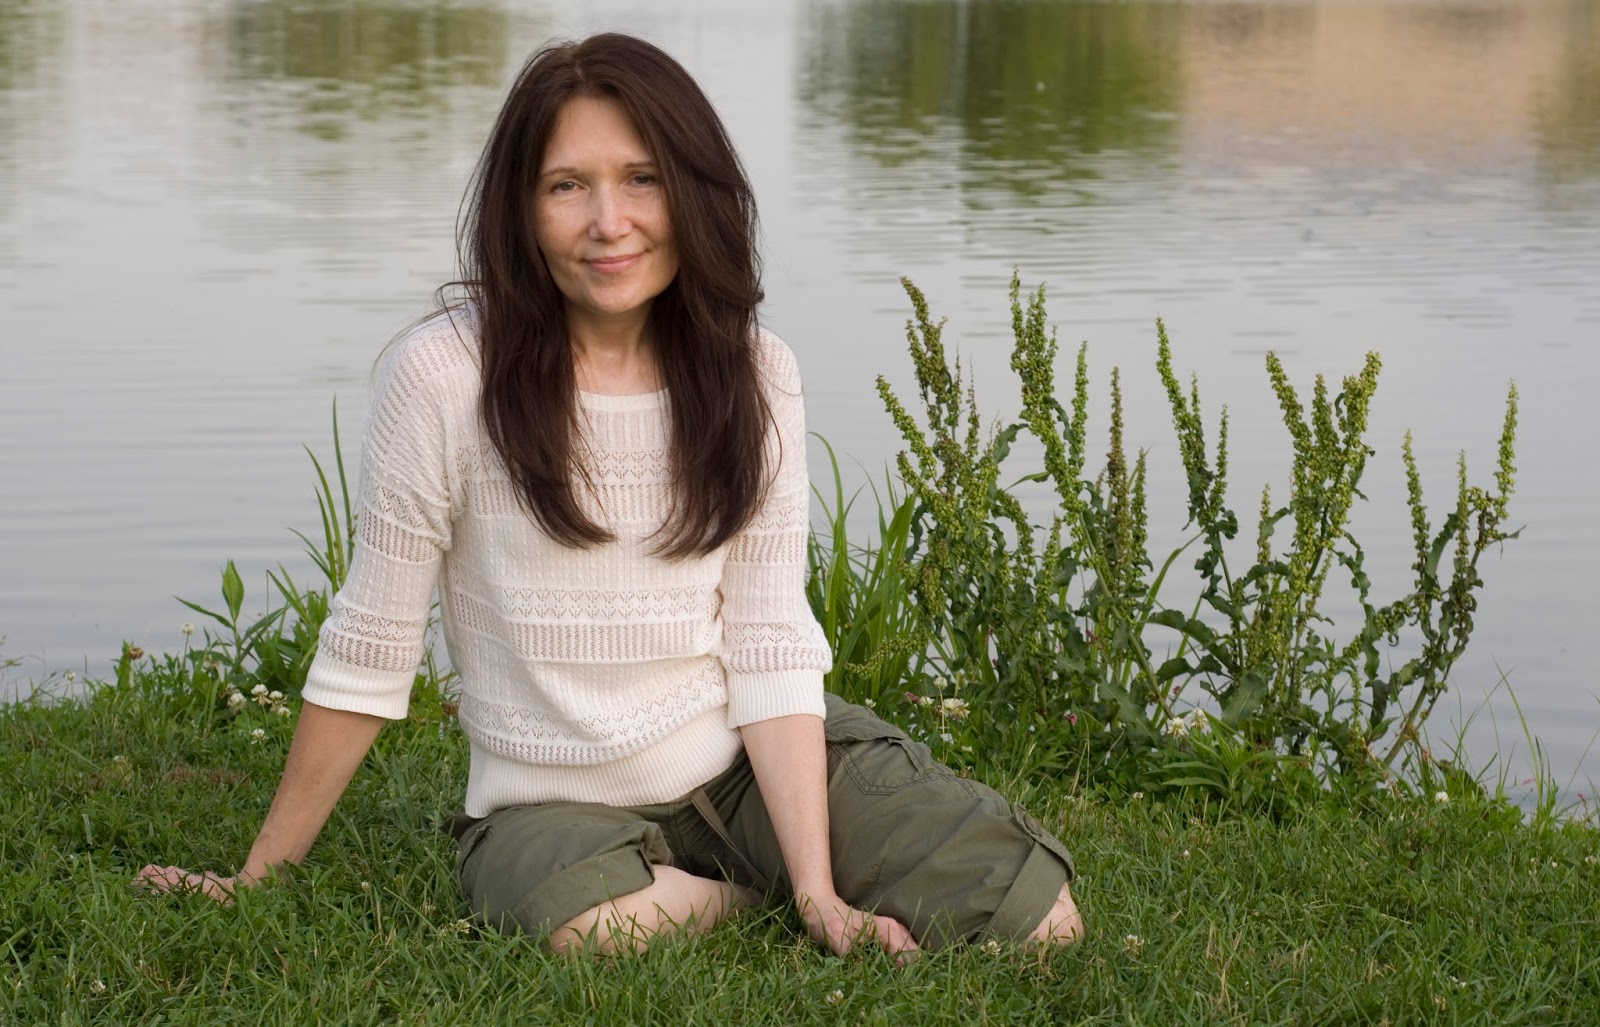
There are lots of things that can make a photo better, but most of these things are not used by amateur photographers, sometimes not even by professional photographers (because they're not needed in all situations, or because can be difficult to carry around). During the photoshoot in the picture above, I only used the first two necessary things. There are times when I use the extras, but you can get great photos without them.


Please remember that I am writing this tutorial from one amateur photographer to another. Though I have been playing around with DSLR cameras for a long time, I am not a professional, and I have never had any formal training. With that out of the way I'll explain some of the first things that I learned when transitioning out of Auto mode. And hopefully it will explain why the above photo is over-exposed.

1. There are three settings on your camera that are the most important settings when it comes to exposure. Those thing are ISO, shutter speed, and aperture.
 The ISO is like the film speed on film cameras. The higher these numbers, the lighter you photos will be, but they will also get grainier. I usually keep mine below 800 even at night unless it is absolutely necessary to set it higher.
The shutter speed is the amount of time the shutter stays open. The longer it stays open, the brighter the pictures. It is best not to make this number any lower than the focal length of your lens. When I'm shooting with a 50mm prime lens, like the one in the photo above, I try to keep the shutter speed to about 1/60 (one sixtieth of a second) or faster. If you have to make it slower and tripod will come in handy. Try not to make it too slow with moving subjects, like people and pets.
The aperture is the amount of light that a camera lets in when the shutter is open. It is the size of the opening that lets light in. The smaller that number, the lighter the photo will be, but less of the photo will be in focus. If you want blurry backgrounds keep the numbers fairly low. I believe that the aperture in the photos above is around 4.

2. Once you get all of those settings working together to create the perfect exposure, you can shift your concern to the color of your photo. I'm talking about white balance. I like to use custom white balance, but that is not always necessary. Your camera should have several preset white balances and

Here is a perfect example of a photo that had the incorrect white balance. I took this photo a few years ago and tried to fix the white balance in post processing, but it is still not perfect. Make sure to practice with white balance and see what works best for you. High numbers will make your photo look warmer (more orange and red) and low numbers will make it look cooler (more blue and purple). Make sure to use a setting like tungsten or a really low number when taking photos using indoor light. You don't want them to look orange.

3. Another thing that is really important to getting a good, sharp photo is focus (which is also a problem in the photo above). When you look in your camera's view-finder, you'll see a bunch of small rectangles, squares, or dots. These are focal points. When working in manual, you can move a cursor around to select one of these focal points. When taking photos of people it is important that the selected focal point be directly on the subject's eye. This is usually where we want to focus. That should make that point the sharpest part of the photo. If you're having difficulty focusing on the exact spot that you want, try turning the aperture up slightly, it'll give you a broader depth of field.

4. Lighting is probably the most important part of a great photo. All of my favorite photos have great lighting, but it can be difficult to understand. It comes from one direction, bounces off of nearly everything and goes another direction, picking up colors to cast on your skin along the way. When you first start working with natural light, it is probably best not to shoot in direct sunlight. If you really want the look of sunlight in your pictures, start by taking photographs during the sunset and the hours just before and after.    
For the picture above, it was a bright, HOT, and sunny day. To get softer light my husband and I stood under a tree. I set the camera on a tripod, set the timer, and ran. You can see that the background is overexposed, but we, the subjects, are not.
Another helpful tip when you're shooting in direct sunlight is to face your subjects away from the sun. This is where an off camera flash or reflector come in handy. Make sure that your subjects, who are shadowed by the sun, are properly exposed.

That is what you need to know to get started in your photography adventures. I'll post more tutorials from a beginner for beginners on how to get photos like the ones below. Thanks for reading!
A little sensual ;) It'll be a tutorial on experimenting with lighting and working indoors.

On lighting and getting that blurry background and flowing water.

Finding the light and post processing.

Using off-camera flash and lighting set-ups.