Pages

Monday, November 4, 2019

Restoring a Thrift Store Chair

Hey guys! I’m trying to keep up with a blog entry a week and a craft a week. This week I finished a project I started months ago. I didn’t want to spend money on fabric and batting, so I put it off. But this week I did some creative shopping and finished this project on the cheap.

The Chair
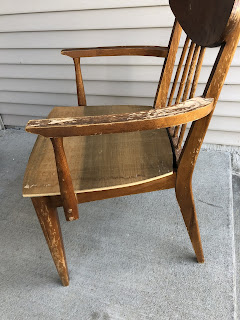
I found this chair at Habitat for Humanity Restore and fell in love...not with the condition of it, but the shape. It had beautiful, clean, mid-century lines. I knew it could be as beautiful as it once was.


Step One: Sanding
I used a small detail sander on the flat parts of this chair, which went quickly. But.....most of this chair was not flat. I used 80 grit sandpaper to sand the rest by hand. This was not a fun task. When that was done (days later), I went over the chair with a finer grit sandpaper, again by hand. This is what it looked like when it was done. The cat approved.
Step Two: Staining
This was the difficult part. I just couldn’t decide what color I wanted. I almost chose to wax it because I loved the natural color of the wood, but decided on using some stain I had on hand, Minwax in Early American. After testing the stain on different parts of the chair, I realized that the back of the chair, which was covered with a wood veneer, was darker than the rest of the chair. When I used just a water-based polyurethane, it almost perfectly matched the stained wood on the rest of the chair. Here is what it looked like after staining. 

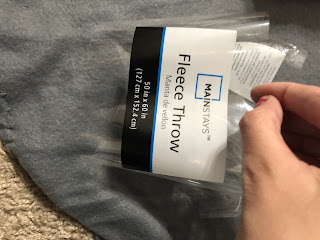
From here, all that was left was to upholster! I thought about so many fabrics. I could choose a pattern, colors, or something simple. Since I didn’t want to do it again in the future, I landed on something simple. I’ve told you before that I’m cheap and this was no exception. I already had some foam from an old mattress topper, but I saw the prices of fabric and batting, and just said no. So I put it off...for months. Finally, I made it a priority again, but insisted that I would not spend more than $10 on the fabric and batting. I searched the fabric section at my local Walmart, and found a fabric remnants section. I bought a faux suede-like fabric at 2 yards for $3. This was much more than I needed. I checked the prices of the cotton batting and really didn’t want to pay $7 a yard. So I felt of the cotton batting and thought I could get away with using a fleece blanket for $2.50 instead. 


The fleece throw worked just fine. I stapled it onto the seat of the chair over the foam. Then added the fabric. I don’t know if this was the correct way to do it, but it worked for me on this project. I was thrilled with the final result.
 

This won’t be staying in my bedroom, but will be moved to the office/guest room when that room is finished. I’m so excited for upcoming projects for that room and I can’t wait to share them with you! 


Tuesday, October 29, 2019

Thrift Store Lamp Makeover


Hello Everyone! Life has gotten in the way of blogging recently, but I’m making it a priority. When I started this blog, I didn’t have a direction, I just needed something to do after grad school. This year I’ve spent remodeling my house and doing home updates for my mom and grandma helped me to discover a passion...creating beautiful things. Now I have a direction for this blog. So, without wasting more time talking about myself....

The Ugly Lamps

I stopped by Goodwill, not looking for anything in particular, and stumbled upon these beauties. Knowing my mom had been looking for large lamps, I scooped them up. (Pardon my cat’s bath in the background...she does what she wants).


I had a plan for them and soon convinced my mom to look beyond the dated exterior.

The Goal

I decided I wanted them to look like these lovely lamps from Hobby Lobby. While I wouldn’t call the Hobby Lobby lamps overpriced, I’m far too cheap fiscally responsible (...I’m cheap 🤷‍♀️) to pay that somewhat reasonable price. Why pay more when you can create a one-of-a-kind for less? Also, she wanted a bigger lamp. With my inspiration in mind, I set to work.

Buy it here

Step One

I wanted to use what I had on hand (I keep a collection of leftover and clearance paint) so I used a gray tinted Valspar primer leftover from a project I helped my cousin with. I wanted a layered look with some depth, so I figured the primer color wasn’t that important. This is what it looked like after a coat of primer. Most of the brass was covered, so I was satisfied with one coat.

Step Two

I needed to choose a paint color. I had several laying around from white to cream to gray, brown, and black. I settled on an almost white gray. Here’s what it looked like after one coat of paint.


Step Three

My plan was to use dark wax to give the lamps a turned wood look, but I wanted to use what I had on hand. So, I searched my collection for something that would work. After testing stains over the paint on a paper plate, I chose to use Minwax stain in Jacobean. Using the same brush I used to paint the lamps, a cheap 3” dollar tree brush, I made horizontal strokes, blending until I achieved the look I was going for, which was a bit streaky. I dabbed my brush off on a paper plate before brushing on the lamps. I dipped my brush in the paper plate instead of the stain can when I was able to in order to avoid going overboard...something I often do. Here is what they looked like after the stain was applied.
I wasn't unhappy with the results at this point, but they were a bit shiny. I gave them some time to dry...and they were still shiny. The stain is oil based, so I didn't expect them to be matte. I decided to finish them with a matte clear coat, but I didn't know which one to use. I was wary about using anything water based because I didn't want it to separate, but I also didn't want to mess up or further blend my current finish by brushing something on. I ended up using Krylon Matte Clear Coat, a spray clear coat. And here are the results. 
I am so happy with the results. They don't look exactly like my inspiration photo, but that makes me love them even more. They are perfect for my mom's space. I had to do a side-by-side to believe they were the same lamps as before. 
 My mom, who lives far away, sent me this photo of the lamps in her living room. 

Update: The lamp shades that came with the lamps weren't the best choice for her home. So I happened upon these lamp shades at Goodwill and purchased them for $2.99 each. By the way, what's up with $20 plus lamp shades in every store? I was shocked at the price tags. I told you, I'm cheap. 

Now for the grand totals. 

Lamps: $5.99 each, total $11.98
Primer: Free (already on hand)
Paint: Free
Stain: Free
Top Coat: $3.98, total $3.58 after my dad's veteran's discount
Shades: $2.99 each, total $5.98
Grand Total: $21.54 for both lamps and shades.

In all, the lamps aren't perfect, but they're exactly what we needed. And it was a fun DIY to do with my mom. I can't wait to visit my mom and share a photo of the lamps with their new (thrifted) shades.  


Monday, April 11, 2016

Life After Grad School

After Graduation?

I started this blog as a graduate student in an effort to write about how I was doing everyday life. I was supposed to write to keep myself sane. I didn't have time for that. Now that graduate school is over, I can do whatever I want...after work. I'm just not sure what to do. I'm not great at anything except for school. I have been thinking since graduation, which was nearly a year ago, what direction I want this blog to take. I don't expect to make much money from it, but I want to write about something that I enjoy. What have I been doing since grad school and what do I want to be doing?

1. Working
I have a full time job, and I was lucky enough to get to utilize my degree soon after graduation. I enjoy my job, but with it comes stress that I need an outlet for in my free time. 

2. Blogging
I just started blogging again today. I thought I would never enjoy reading or writing again after grad school, but I finally feel like I can get back to normal. 

3. Crafting
I have spent a great deal of time writing crochet patterns and crocheting. I've also learned some new crafts that I would like to share, like etching metal and glass and using a Dremel. I have begun working toward some home organizing and DIY home decor. I'm thinking about going big and crocheting my own rug. 

4. Financial Endeavors
I have finally begun learning about investing, saving money, and working on several sources of income. I could start blogging about my financial endeavors: what I do, when I open new accounts, apps that I'm using, and how much money I'm making from it. 

5. Home Organizing
I have no idea how I acquired so much stuff with so little money, but there's stuff everywhere and it needs to go somewhere. I am by no means an expert at this. In fact, I suck at it. But I would be happy to share my learning experiences with the internet.

I realize that my blog is not a niche blog and that I need to narrow my subject matter, but I don't know which direction to take it. Theses are basically the only things that I really know how to do. They're certainly the only things that I'm doing for fun. If my next blog posts are about all of these things, I'm working on narrowing it down. Now that I have time...and a little more money, I can't wait to get started writing about my new life. Feel free to comment and let me know what you'd like to hear from me. 

Thursday, July 16, 2015

How to: Levitation Photography

I've been looking forward to trying levitation photography for a long time. For those of you who don't know what that is, I'll break it down. The idea is to get a picture where a person (or object) looks as though they are floating. In order to accomplish this, you must use at least two photos. Here are some shots that I took this week!


Here's how to do it.
Things you'll need.
1. A tripod
2. A camera that you can set to manual
3. A chair/ladder/stool anything to get your subject off of the ground

What to do:
1. Set up your tripod...using a remote would be useful, but not absolutely necessary
2. Do not move the camera!!! You'll need at least two shots and the camera should not move and the lighting should not change at all between those shots.
3. Take a photo of an empty background. Like the one below.
4. Take a photo of your subject posed however you want. Like the one below.
5. Open both of these images in Photoshop.
6. Bring up the one with the subject in it and click the layer in the layers box. 
  7. Drag that layer (should be labeled background) onto the photo without the subject as shown below.

8. Add a vector mask. After Layer 1 is highlighted, click the button circled in the photo below. The mask should be added to layer one and it should look the same as where the arrow is pointing. This will allow you to erase away any areas where you want background to show through. 

  9. Make sure the white box next to Layer 1 is highlighted, then click on the paintbrush tool. The colors in the boxes should show up as black and white. Make sure that black is the color on the left, as shown below. 
10. Begin painting over the areas that you want to get rid of. You can start with a big brush and work your way down to a smaller brush as you get closer to your subject. 

11. When you are getting very close to your subject, it can be helpful to use a small brush and lower the opacity. It seems to help blend the two layers, making the transition from one to another less obvious. It will be particularly helpful in areas like the one in the photo below. 


12. When you are happy with the final product. Flatten the image by right clicking one of the layers and then clicking 'flatten image.' 

13. Now you can do any edits that you want to the color, or you can smooth skin and remove blemishes. 

14. Finally, I like to add a shadow below the subject. I usually just use the burn tool to draw in the shadow on the flattened image, but if that is too harsh for your photo you can try something different. You can duplicate the Background layer by right clicking the Background layer and clicking 'duplicate layer'. Then use the burn tool to draw in the shadow on the new layer, reducing the opacity of the layer to suit your taste. 

Option 1:
Simply click the tool that is circled in the photo below and draw on the shadow. If another tool is visible in that spot, right click it and select the one in the photo.
Option 2:
Right click the Background layer and then select 'Duplicate Layer'. I window will pop up. Just select 'OK'. Then paint on the shadow.
Drag down the opacity until the shadow looks the way you want it to look. 


Here is the final result that I got while doing this tutorial.

Disclaimer: Actually a couple of disclaimers. I am not a professional photographer. This is my hobby. I hope to help new hobbyists and "momtographers" to learn new stuff about their cameras. I know that this is not the only way to do this in Photoshop, and maybe not even the best way...but it worked for me.  


Wednesday, June 10, 2015

Summer Photos Speedlight DIY

Summer Shoot: How's that for 55!

That's right. My model for this beautiful June shoot is 55 years old and happens to be my beautiful mom.  Soft lighting is great for smooth looking skin, but she looked 30 to begin with!

Here are a few of my favorites from the day, but wait until you see the ones from sunset!

Our prop was homemade from a chair we got at the Habitat for Humanity ReStore and spray painted.

It was a mostly sunny day so we looked for shade. We went to a public park and found some trees. In most of these pictures the sun was coming from behind her right side. The photos were shot in RAW and only had the contrast adjusted and sharpened. We moved a little closer to the edge of the shade for some of the photos to get the sun in her hair.  In those photos the sun i also behind her, but not directly.  

When the sun set.

As we neared the end of the day, we decided that we wanted more than just silhouette photos with the sunset and broke out the speedlight. It was very simple. We covered it with a soft box and set it to 1/1, the brightest flash, and started shooting.  I first exposed for the sky, then added the flash to illuminate the subject.  All you need is a speedlight that shoots in manual (a cheap one is fine), a radio trigger for that speedlight, and a light stand. 

Another sunset photo.
 Loving our homemade prop in this one.


 Moved to another part of the park.
 Loved the cattails in the background.
Looking directly toward the setting sun behind the clouds.
Maybe one silhouette.

Sunday, February 22, 2015

My Acne Story...

...and I how I cleared it up.


How I went from acne to clear.


Hello everyone! I'm still living in a winter wonderland here in Kentucky. I've been stuck inside the house for a week and I finally get to go back to school tomorrow! With midterms coming up, I'll keep this brief.  I wanted to tell you guys about my years long struggle with acne and the things I've tried to do to make it better.  It's been a long journey, but I feel like I've finally got it under control.  Thanks for reading. I hope you find this helpful.

*Disclaimer: I am not a dermatologist or any kind of skin-care professional. What you're about to read is my personal experience and what has worked for me.

I started getting acne when I was about 12 years old.  It was several pimples, both small and the deep large ones, on my chin.  I tried just about everything available over the counter.  All of the systems available at the drug store and even the stuff from the infomercials didn't do anything for me but make my face red.  I tried them all for long periods of time and was very careful to follow a routine.  

A photo of me at 12 will be inserted here when I can find one. We did not have a digital camera in 2001.  

When I was 13, I went to a dermatologist.  I tried several prescriptions. Some that did nothing, some that made me break out, and some that made me throw up (gross, I know).  Finally, I was given Differin (adapalene) cream in 0.1%.  This was the first time that I noticed an improvement in my acne.  It was completely clear (like, I couldn't get a pimple) all the way through high school.  

Me at age 14. See how perfect my skin was!

When I was around 22, I started getting acne again.  It was on my chin and the Differin didn't seem to help, so I stopped using it.  That was a bad idea.  When I stopped using the Differin my acne got worse and using it again did nothing.  It got pretty bad after that.

 
Started with pimples on my chin.

I got frustrated and stopped doing my regular routine.  Sometimes I would go two days...maybe more once or twice three days...without washing my face.  That made things even worse.  While I had never had acne on my forehead, now it started.  The worst part was the fact that starting my routine again didn't help. Here's what happened after that:


This was during the time when I was being very unpredictable with my skin-care routine.

This was June 2013, when we bought our first house. No improvement and no change in routine.


In the three pictures above, I had started using the Differin and adding Kate Somerville EradiKate, a sulfur spot treatment.


Finally I decided to try benzoyl peroxide again. The photos above show what happened with that. I still use the EradiKate when I have a bad spot.  I started using Murad Acne Spot Treatment all over my problem areas (chin, nose, forehead).

Now that I have showed you every terrible picture of me in the past 3 years (and one from high school) I'll show you photos of me with and without makeup today.

The only photo with makeup.

No makeup

No makeup. Small spot on my cheek.

No makeup again. 

Thanks for reading. Be sure to leave comments with any questions and I'll do my best to answer them. Btw...I didn't think that my acne ever got bad enough to try isotretinoin (Accutane).  If it had gotten bad enough, I would have tried it, but since it can be dangerous, I decided to skip that treatment. I also almost decided to get microdermabrasion (to get rid of acne scarring and even out my skin's texture again), but read some terrifying stories about how it had left broken capillaries on people's faces and I cancelled my appointment. I think I'll stick with at-home scrubs.