Pages

Thursday, July 16, 2015

How to: Levitation Photography

I've been looking forward to trying levitation photography for a long time. For those of you who don't know what that is, I'll break it down. The idea is to get a picture where a person (or object) looks as though they are floating. In order to accomplish this, you must use at least two photos. Here are some shots that I took this week!


Here's how to do it.
Things you'll need.
1. A tripod
2. A camera that you can set to manual
3. A chair/ladder/stool anything to get your subject off of the ground

What to do:
1. Set up your tripod...using a remote would be useful, but not absolutely necessary
2. Do not move the camera!!! You'll need at least two shots and the camera should not move and the lighting should not change at all between those shots.
3. Take a photo of an empty background. Like the one below.
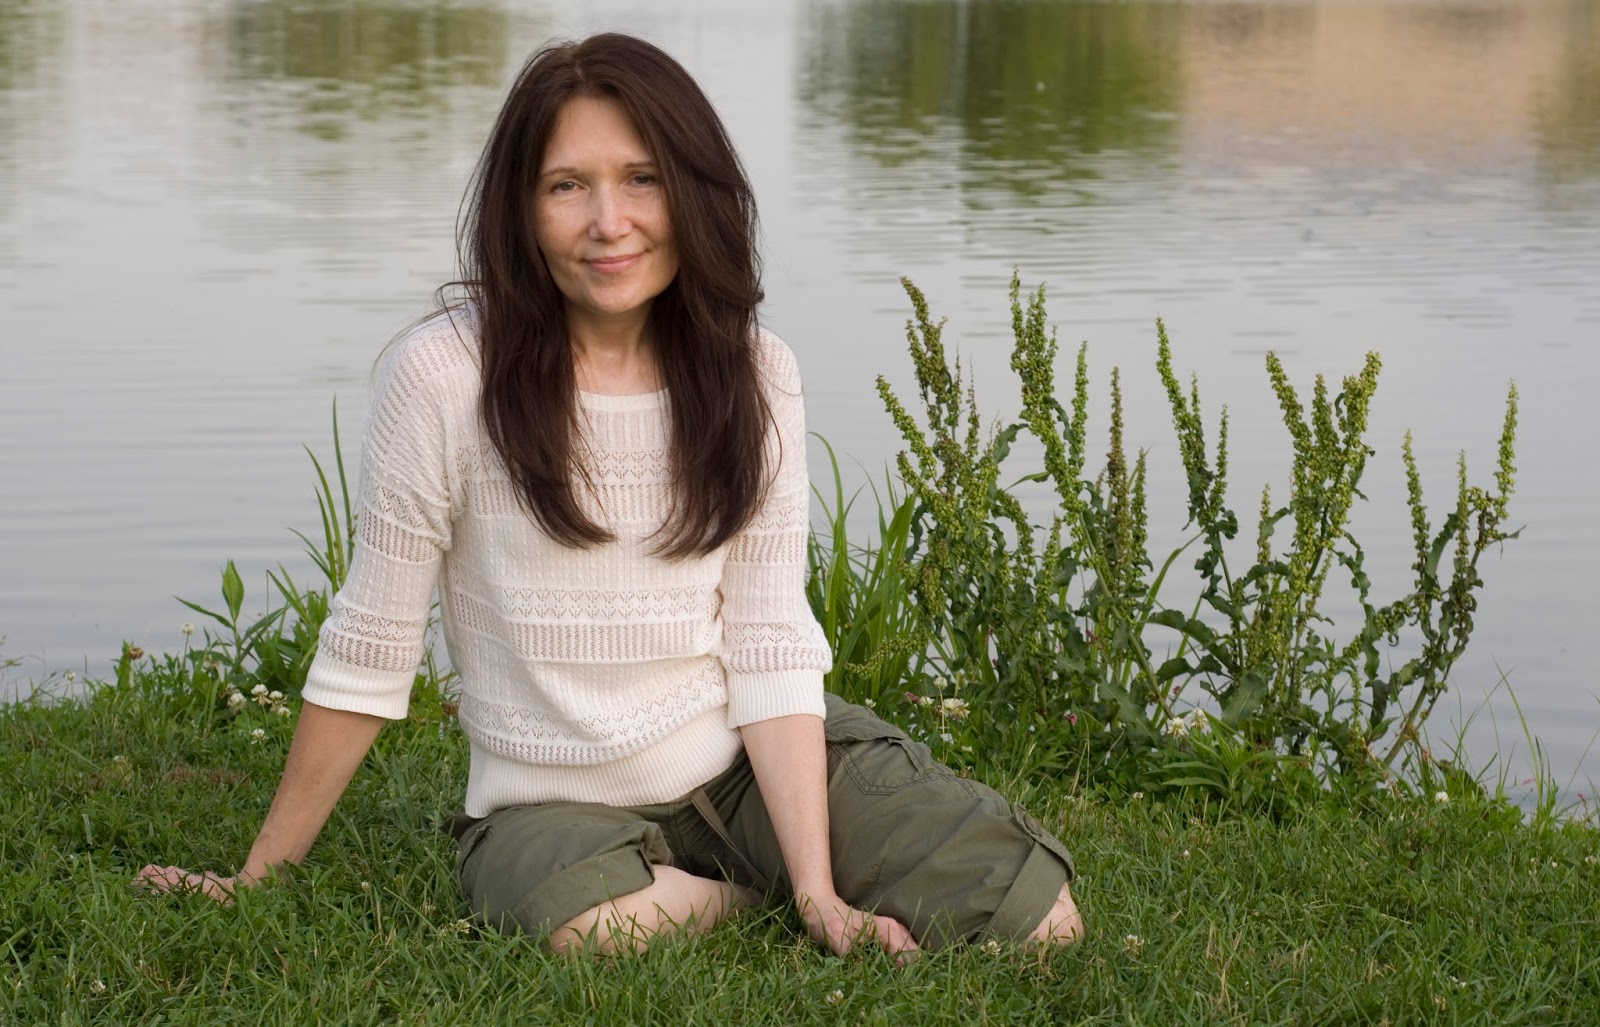
4. Take a photo of your subject posed however you want. Like the one below.
5. Open both of these images in Photoshop.
6. Bring up the one with the subject in it and click the layer in the layers box. 
  7. Drag that layer (should be labeled background) onto the photo without the subject as shown below.

8. Add a vector mask. After Layer 1 is highlighted, click the button circled in the photo below. The mask should be added to layer one and it should look the same as where the arrow is pointing. This will allow you to erase away any areas where you want background to show through. 

  9. Make sure the white box next to Layer 1 is highlighted, then click on the paintbrush tool. The colors in the boxes should show up as black and white. Make sure that black is the color on the left, as shown below. 
10. Begin painting over the areas that you want to get rid of. You can start with a big brush and work your way down to a smaller brush as you get closer to your subject. 

11. When you are getting very close to your subject, it can be helpful to use a small brush and lower the opacity. It seems to help blend the two layers, making the transition from one to another less obvious. It will be particularly helpful in areas like the one in the photo below. 


12. When you are happy with the final product. Flatten the image by right clicking one of the layers and then clicking 'flatten image.' 

13. Now you can do any edits that you want to the color, or you can smooth skin and remove blemishes. 

14. Finally, I like to add a shadow below the subject. I usually just use the burn tool to draw in the shadow on the flattened image, but if that is too harsh for your photo you can try something different. You can duplicate the Background layer by right clicking the Background layer and clicking 'duplicate layer'. Then use the burn tool to draw in the shadow on the new layer, reducing the opacity of the layer to suit your taste. 

Option 1:
Simply click the tool that is circled in the photo below and draw on the shadow. If another tool is visible in that spot, right click it and select the one in the photo.
Option 2:
Right click the Background layer and then select 'Duplicate Layer'. I window will pop up. Just select 'OK'. Then paint on the shadow.
Drag down the opacity until the shadow looks the way you want it to look. 


Here is the final result that I got while doing this tutorial.

Disclaimer: Actually a couple of disclaimers. I am not a professional photographer. This is my hobby. I hope to help new hobbyists and "momtographers" to learn new stuff about their cameras. I know that this is not the only way to do this in Photoshop, and maybe not even the best way...but it worked for me.  


Wednesday, June 10, 2015

Summer Photos Speedlight DIY

Summer Shoot: How's that for 55!

That's right. My model for this beautiful June shoot is 55 years old and happens to be my beautiful mom.  Soft lighting is great for smooth looking skin, but she looked 30 to begin with!

Here are a few of my favorites from the day, but wait until you see the ones from sunset!

Our prop was homemade from a chair we got at the Habitat for Humanity ReStore and spray painted.

It was a mostly sunny day so we looked for shade. We went to a public park and found some trees. In most of these pictures the sun was coming from behind her right side. The photos were shot in RAW and only had the contrast adjusted and sharpened. We moved a little closer to the edge of the shade for some of the photos to get the sun in her hair.  In those photos the sun i also behind her, but not directly.  

When the sun set.

As we neared the end of the day, we decided that we wanted more than just silhouette photos with the sunset and broke out the speedlight. It was very simple. We covered it with a soft box and set it to 1/1, the brightest flash, and started shooting.  I first exposed for the sky, then added the flash to illuminate the subject.  All you need is a speedlight that shoots in manual (a cheap one is fine), a radio trigger for that speedlight, and a light stand. 

Another sunset photo.
 Loving our homemade prop in this one.


 Moved to another part of the park.
 Loved the cattails in the background.
Looking directly toward the setting sun behind the clouds.
Maybe one silhouette.

Sunday, February 22, 2015

My Acne Story...

...and I how I cleared it up.


How I went from acne to clear.


Hello everyone! I'm still living in a winter wonderland here in Kentucky. I've been stuck inside the house for a week and I finally get to go back to school tomorrow! With midterms coming up, I'll keep this brief.  I wanted to tell you guys about my years long struggle with acne and the things I've tried to do to make it better.  It's been a long journey, but I feel like I've finally got it under control.  Thanks for reading. I hope you find this helpful.

*Disclaimer: I am not a dermatologist or any kind of skin-care professional. What you're about to read is my personal experience and what has worked for me.

I started getting acne when I was about 12 years old.  It was several pimples, both small and the deep large ones, on my chin.  I tried just about everything available over the counter.  All of the systems available at the drug store and even the stuff from the infomercials didn't do anything for me but make my face red.  I tried them all for long periods of time and was very careful to follow a routine.  

A photo of me at 12 will be inserted here when I can find one. We did not have a digital camera in 2001.  

When I was 13, I went to a dermatologist.  I tried several prescriptions. Some that did nothing, some that made me break out, and some that made me throw up (gross, I know).  Finally, I was given Differin (adapalene) cream in 0.1%.  This was the first time that I noticed an improvement in my acne.  It was completely clear (like, I couldn't get a pimple) all the way through high school.  

Me at age 14. See how perfect my skin was!

When I was around 22, I started getting acne again.  It was on my chin and the Differin didn't seem to help, so I stopped using it.  That was a bad idea.  When I stopped using the Differin my acne got worse and using it again did nothing.  It got pretty bad after that.

 
Started with pimples on my chin.

I got frustrated and stopped doing my regular routine.  Sometimes I would go two days...maybe more once or twice three days...without washing my face.  That made things even worse.  While I had never had acne on my forehead, now it started.  The worst part was the fact that starting my routine again didn't help. Here's what happened after that:


This was during the time when I was being very unpredictable with my skin-care routine.

This was June 2013, when we bought our first house. No improvement and no change in routine.


In the three pictures above, I had started using the Differin and adding Kate Somerville EradiKate, a sulfur spot treatment.


Finally I decided to try benzoyl peroxide again. The photos above show what happened with that. I still use the EradiKate when I have a bad spot.  I started using Murad Acne Spot Treatment all over my problem areas (chin, nose, forehead).

Now that I have showed you every terrible picture of me in the past 3 years (and one from high school) I'll show you photos of me with and without makeup today.

The only photo with makeup.

No makeup

No makeup. Small spot on my cheek.

No makeup again. 

Thanks for reading. Be sure to leave comments with any questions and I'll do my best to answer them. Btw...I didn't think that my acne ever got bad enough to try isotretinoin (Accutane).  If it had gotten bad enough, I would have tried it, but since it can be dangerous, I decided to skip that treatment. I also almost decided to get microdermabrasion (to get rid of acne scarring and even out my skin's texture again), but read some terrifying stories about how it had left broken capillaries on people's faces and I cancelled my appointment. I think I'll stick with at-home scrubs.  


Saturday, February 14, 2015

Colorizing Black and White Photos


This is not a complete how-to post, but I would like to share some of my new (very amateur) Photoshop work! I'm using a copy of Photoshop CS2 that I got for my birthday years ago...it's maybe 7 years old.  All I'm doing is working in new layers for each color and changing the blending mode.  If there's any interest, I'll do a complete how to very soon.

The photo above was taken around 1962 (about 54 years old).  It is a photo of my great aunt and great uncle, my grandma's sister and my grandpa's brother.  When I traveled home for my great aunt's funeral, I saw this photo hanging on a collage cork board.  My great uncle expressed interest in having an enlargement.  I couldn't just blow it up...I had to make it better.  After removing some scratches and noise from the photo (using the cloning tool, the patch tool, and noise reduction), I desaturated the photo, added some contrast and sharpened it with smart sharpen.  That made a decent looking black and white.  But I still couldn't let it go.  After talking with my grandma, I learned the color of everything in the photo and went to work.

I added an adjustment layer to the photo, chose a color, inverted the selection, chose "overlay" for the blending mode, and started painting with a paintbrush set to white to let the color layer show up.  I did this for every color that I used (five shades of green for the grass and trees).  I labeled each layer with the name of the thing that I would be painting (pants, shoes, skin) so that I wouldn't get them confused.  When the colors overlapped, like the green and the skin color were one on top of the other, I selected the layer that I wanted to move and used either the smudge tool to move it, or the brush tool to hide it.

Here are my final results:


PS: Don't forget to add some pink tones to their faces.  If you don't, they'll look pale.

Thanks for reading! Be sure to leave comments letting me know what you think, what you want to see, and ideas on what to do better. I want to learn how to Photoshop and take photos!


Friday, February 13, 2015

Graduation Announcement Photos


Here I am blogging when I should be studying...sigh.  APA has convinced me that I must double space after each punctuation mark.  Graduation is coming.  Today I'm sharing an idea for a graduation announcement (because I'm not paying a bundle for the same ones that everyone gets).  Since i love photos, I want to make photo announcements.  So here's the idea: since this is my very LAST graduation EVER, I want to compile all of my old graduation photos, kindergarten to college and put them together.  I think I'll even include one of me in my cap and gown...if it gets here on time.  I wanted this to be a surprise to everyone that I invited, but I couldn't wait to share it with you guys!

First up.....1995
That's little me at my first ever graduation!

Next up: This photo circa 2003 of my 8th grade graduation.
We didn't wear a cap and gown that year :(

Picture number three: Going back to 2007...high school.
Red is just not my color...

Next is 2010...my Associate's degree.
I don't like this photo.I think both lights were set to the same brightness....but I didn't take it.

We've finally made it to 2012...my BA!
This is my favorite of all of them! But it's really the only one I did much work for. 

Graduation is in May!! Here's to hoping that all goes smoothly and I walk across that stage with a diploma in my hands! I am more than thrilled to say that I will never have another graduation.  

I am not sure how I will arrange these photos yet, but if anyone has any ideas feel free to leave me a comment.  I also want to know about your luck with printing companies and Photoshop templates.  

The weather here has not been beautiful lately, freezing cold with no snow.  I plan on taking photos as soon as I get the time and the weather cooperates.  I promise that these blogs will get more frequent and dependable as soon as school is D-O-N-E!!!!  Please leave comments and let me know what you think and what you'd like to see more posts about.  I think my favorites are photography tutorials, I'll try to get my husband to take photos of what I'm doing next time and go more in depth.  Thanks for reading!